In the event that your RV or campsite’s roof is leaking, damaged or worn out as well, it could be time to fix or replace the roof.
Over time the effects of rain, wind, snow , and even ultraviolet rays of the sun could cause damage to sealing materials or RV roof material and lead to water damage as well as other problems. It is important to take care of RV roof issues as quickly as you can, in order to prevent any further destruction.
Are you worried that your RV roof leaky? Are you worried about the amount it’s going cost to repair? If yes, then you’re the only one.
One of the most frequent concerns people ask about their leaky motorhome or the travel trailer roof is what it will cost to fix or replace it.
Camper roof replacements generally cost between $300 to $325 per linear foot. If, for instance, you RV has a length of 30 feet, then it could cost between $9,750 and $9,000 in order to repair the roof that covers your RV.
The cost is mostly based on the kind of roof material and also the costs for labor of the auto shop who is performing the task. However, you might be able to fix or replace the roof of your RV roof by yourself.
The article below will go over the top kinds of RV roof material and the costs associated with them in addition to describing the steps needed to seal repair, replace, or repair the camper’s roof. I’ll also give tips to ensure that the RV roof in top state of repair.
Type Of RV Roofing Material And How Much Do They Cost To Replace
The most commonly used kinds of camping roofing material include TPO, EPDM, fiberglass and aluminum.
The majority of the time, EPDM and TPO are the most widely used and most common kinds of material employed for RV roofs.
Every type of roofing material offers different benefits as well as costs and maintenance requirements. Let’s look at it!
EPDM
Rubber EPDM (Ethylene Propylene Diene Monomer) is synthetic rubber material with a membrane-like design which is commonly used for flat roofs, such as those found on travel trailers and RVs.
EPDM can be extremely long-lasting and economical it typically costs between $4-$8 for a square foot.
Based on our 30 foot RV example, it will cost between $1,020 and $2,040 for an EPDM 255 square foot roofing material to cover the RV in the event that it is eight feet in width.
TPO
The TPO (Thermoplastic Polyolefin) is the most popular material that is used in RV roofs.
The material is one-ply, which means that it’s just a one-layer of rubber that has a the scrim for reinforcement. Similar to EPDM the material is used primarily to make flat roofing.
TPO is extremely UV-resistant and it will help to lower energy usage when used as an RV roof. Furthermore, it’s extremely long-lasting and, if maintained properly it could last up to 30 years.
Good quality TPO RV roofing is priced about $5.50 to $6 for each square foot. So, with our camper that is 30 feet, the cost of the TPO by itself would range between $1,400 to $1,530 for the 255 square feet of material.

However, if there are multiple areas where the roof is damaged, or there’s a single area with extensive damage that is compromising the rest of the roof, it may be time to replace it.
Tools You Will Need
When you plan to repair or replace your camper’s roof yourself, there are some tools you’ll need to get the job done as quickly and effectively as possible.
Although every job is different, some general tools you should have on hand for dealing with your RV roof include:
- Safety glasses
- Roller to roll out and flow the adhesive
- Acetone or other cleaner, like a 3M Scotch Bright Pad
- Razor knife or shears for cutting the replacement material
- Scraper or utility blade to remove old caulking
- Respirator (for fiberglass roofs)
- Rubber gloves
- Bucket for mixing adhesive/catalyst
Prepare Your RV Roof For Repair Or Replacement
The first step to any RV roof job is to clean the existing roof or repair area well. In order for the adhesive or catalyst material to bond with the roof material, all traces of oil, grease, grime, oxidation and silicone sealants must be removed.
If it’s just a small repair, feel free to use a rag and a solvent to scrub the area clean.
For larger repairs and full roof resealing jobs or replacements, it might be more effective to first power-wash, then scrub where necessary until the roof is completely clean.
With EPDM roofing, you will need to cut away any residual silicone caulking and remove any surface wax with a removing agent designed for this purpose.
Once the roof is dry after cleaning, you will likely need to apply an EPDM primer.
Even if you did a fantastic job cleaning the roof, it’s likely to still be dirty or stained in some areas, so using a EPDM primer will prepare the surface for a better bond between the roof and the tape.

How To Repair A Punctured RV Roof
Although you might pay a professional to do a full roof replacement for your RV, there are many roof repair jobs that are easy and far cheaper if you do them yourself.
One of these is repairing a punctured or torn RV roof. To fix this kind of damage, all you really need to do is install a patch:
- Thoroughly clean the area around the repair.
- Remove any excess silicone.
- Apply sealant or caulking to any recesses, and let dry.
- Glue down any loose roof membrane, and add fasteners if needed.
- Let it cure 24 hours.
- Apply the patch so that there’s at least two inches of overlap on all sides of the repair area, and cover any reinforcement fasteners.
- Seal the patch and edges around it with RV roof coating.
RV roof tape or RV roof patches are easy to apply, with adhesive on one side that sticks to your RV roof and seals up the torn or punctured area.
These patches are very durable, and provide a permanent solution to a tear or small hole.
It’s a good idea to keep some in your RV’s emergency tool kit just in case something happens while you’re out on a trip. You don’t want a punctured roof causing leaks and creating water damage!
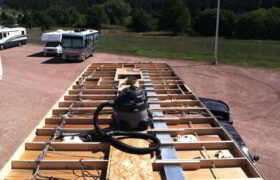
How To Replace Your RV Or Motorhome Roof

A DIY RV roof replacement is certainly possible, and will help you save lots of money since you will only need to buy the materials.
The following are all of the steps to follow when replacing your RV’s roof:
- Remove any fixtures, such as vents, antennas, or air conditioning units. Remove the awning as well.
- Use a high-quality stainless steel putty knife to scrape away the old sealant around the removed fixtures.
- Remove the existing roof membrane. For RV’s rubber roofs such as TPO or EPDM, you will need to peel back the roofing material until you can see the plywood structure beneath. Aluminum roofs require you to unscrew the old panels to remove them, and you will need a dye grinder to remove the fiberglass matting that covers these types of roofs.
- Check the plywood beneath the roof membrane for damage. If you notice areas where the wood is rotted or bowing, it has water damage and should be replaced. Clean the rest of the (undamaged) plywood with mineral spirits to treat it to prevent mold and mildew from growing.
- Install seam tape in places where the plywood meets and along the edge of the camper’s roof where it meets the side of your camper. This will help maintain a good seal and reinforce any weak areas.
- Rubber roofs are installed by coating layers of adhesive onto the plywood roof, then rolling on the roof replacement panels. Fiberglass roofs have similar installation, and you will paint on the adhesive catalyst resin before covering it with the fiberglass matting and gel coat. Allow the adhesive to sit for a little bit until it’s tacky, and then roll your roofing material over the top, pressing out all air bubbles as you go. Cut holes in the rubber or matting for any fixtures that are going back on the roof.
- Rubber roofs are installed by coating layers of adhesive onto the plywood roof, then rolling on the roof replacement panels. Fiberglass roofs have similar installation, and you will paint on the adhesive catalyst resin before covering it with the fiberglass matting and gel coat. Allow the adhesive to sit for a little bit until it’s tacky, and then roll your roofing material over the top, pressing out all air bubbles as you go. Cut holes in the rubber or matting for any fixtures that are going back on the roof.
- After your roof is replaced, the final step is to reinstall your RV’s roof fixtures and seal them with caulking to prevent any leaks in the new roof.
How To Fix A Leaky Skylight, Roof Vent, AC Unit Or Hatch
Since RV’s rooftop systems such as the A/C unit or roof vent are essentially holes cut in the roof, the edges around them can develop leaks that you will need to fix to avoid water damage.
Luckily, it’s a pretty easy job:
- Scrape away any residual silicone caulking.
- Clean the surface of the roof around the leak with a plastic scrub pad or sandpaper, then swab with a solvent-soaked rag.
- Seal the edges around the vent or system with sealant or sealant strips, covering all screws.
- Position the vent flange so that it overlaps the roof surface by about two inches in either direction, and be sure to roll-in the sealant so that it bonds permanently.

The least common RV roofing material you’ll come across is aluminum. Certain travel trailers like Airstream make use of aluminum roofing but it is a much more weight than other camping roofing materials.
Similar to fiberglass, aluminum has low maintenance requirements, and unlike fiberglass and rubber it’s not toxic.
You can also reuse your old roofing as you replace it, as aluminum is one of the very few materials that don’t lose value.
Aluminum roofing sheets are priced at around 3 cents per square foot. So, the price to replace the roofing material on a 30 foot by 8 1/2-foot camper would be about $770.
How RV Sealant and Coating Helps Protect The Roof
Its roofing material is only one of the items you’ll require to complete an RV roof repair or replacement task.
Sealants are essential and water damage is among the most frequent reasons that an RV roof must be repaired or replaced and typically the issue occurs within the seals, or due to that the roof coating has begun to wear down.
If you can spot an issue and address it fast, you can save yourself some time and cash.
If you choose to engage a professional in changing or repairing your RV roof or simply to reseal it. The resealing part of the work could cost anywhere from $1,000 to $1,700 or as high than $2,000 in larger vehicles.
You’ll be able to understand the reasons why the cost of an RV roof replacement could cost up to $10,000 and the reason you may decide to tackle the entire job or even portions of it yourself.
Reinforce The Sealant
It’s suggested that you frequently examine your camping vehicle’s roof for leaks and to reinforce it with sealant on the edges at a minimum of once every year.
While doing this, be certain to seal your air cooling unit roof openings, skylights as well as other areas that could have the possibility of a crack or seam within the roofing material.
If you’ve never applied the sealant prior to now, test its compatibility by applying a small amount to an unnoticed area prior to applying it to all surfaces.
Be aware that should you reside in a humid area it is possible to choose an distinct type of RV sealant.
It is always advisable to consult the manufacturer of your camper for recommendations on the product.@ rambler_reno
Paint The Roof Surface
In the course of the lifetime of your RV there will likely be a need to coat the roof. It is an protective layer that protects the roofing material similar to paint.
Over time over time, the coating is becoming chalky and can fade away. While this is not a problem, it’s an indication to tell it’s time to coat the roof.
The coating is essential as it improves the waterproof and weatherproofing capabilities of the entire roof.
Keep your mind in the forefront that you may require a particular kind of coating in accordance with the kind of roof material you’re using.
Another method for recoating is to use an RV liquid roof that comprises an EPDM coating which can paint on your roof that covers your camping vehicle.
The liquid roof costs about 90 cents per gallon. This covers around 42 sq feet. For our 30 foot by 8 1/2 feet camper, we’d require around six gallons to completely cover the roof.
You could save money if you purchase the material in greater quantities, like five or four-gallon pails.
When dry when it is dry, the liquid roof shields the roof from ultraviolet rays of the sun. It also acts as weatherproofing to stop moisture from entering and slow wear and tear from the elements.
By regular coating you RV roof by applying this kind of protective sealant You can prolong the lifespan that you have of your RV and stop water damage from occurring.
How to Repair or Repair or Replace your RV Roof
If you have an older RV or you’ve been in the camper for a while There’s a high chance that you’ll require replacing the roof at least once time throughout its life.
If you keep on the top of maintenance and repairs and repair any leaks promptly it will reduce or delay the need to replace the entire roof.
However, if there’s several areas in which it appears that the roof has been damaged or if there’s a particular area that is severely damaged that’s affecting the remainder of the roof It could have been time to replace the roof.
Tools You’ll Have
If you’re planning to fix or replace the camper’s roof yourself, you’ll need certain tools that you’ll require to complete the task efficiently and quickly as feasible.
Although each job is unique, some of the tools you must be prepared to deal the roof of roofing issues on your RV roof comprise:
- Safety glasses
- Roll out the roller and then flow the adhesive
- Acetone or another cleaner, such as Acetone or a 3M Scotch Bright Pad
- Shears or a razor blade to cut the material to replace the material
- Scraper or utility knife to scrape away old caulk
- Respirator (for fiberglass roofs)
- Rubber gloves
- Bucket for mixing adhesive/catalyst
Make Your RV Roof for repair or Repair
The first step in the process of completing an RV roof task is to clean the roof or repair area thoroughly. To enable the catalyst or adhesive material to be able to join with the roof material the evidence of oil grease, grime and oxidation as well as silicone sealants have to be eliminated.
If it’s only a minor repair, it’s okay to employ a rag as well as a solvent to clean the area.
For more extensive repairs, and complete roof repairs and replacements it may be better to wash the roof using power, then scrub where needed to ensure that the roof is totally clean.
If you are using EPDM roofing You will have to remove any remaining silicone caulking, and then remove any wax on the surface with an agent for removal specifically designed specifically for this use.
When the roof is clean after cleaning, you’ll probably be required to apply the EPDM primer.
Even if you’ve done great job cleaning your roof there’s a chance that it will still be stained or dirty in certain areas. Therefore, applying an EPDM primer will help prepare the surface for a stronger connection to both the roof and tape.@ flair_distribution
How to Repair A Punctured RV Roof
While you may employ a professional for the full roof repair for the roof of your RV however, there are numerous roof repair tasks that are quick and cheaper to do yourself.
One of them is to repair the tear or punctured RV roof. For repairing this type of damaged, all you require is to install patches:
- Clean the surface around the repair.
- Take off any silicone that is not needed.
- Use sealant or caulking to all spaces, and allow to dry.
- Apply glue to all loose roof membrane. Add fasteners as needed.
- Let it dry for 24 hours.
- Place the patch in a way there’s at minimum 2 inches overlap on both sides of the area being repaired and also secure any fasteners that are used to reinforce the area.
- Cover the patch and the edges around it using RV roof coating.
RV roof adhesive as well as RV roof patches for your RV are simple to apply. They have the adhesive side that adheres to the RV roof while sealing the damaged or punctured region.
The patches are extremely durable and offer a long-lasting solution to the tear or tiny gap.
It’s a good idea have a few items of these in the emergency tools kit in case anything happens during an excursion. Don’t risk a punctured roof that causes leaks and causing water damage!
How to replace your RV or Motorhome Roof
DIY RV roof replacement is definitely feasible and could allow you to save a lot of dollars since you’ll only require the materials.
Here are the complete list of the steps to be followed to replace your RV’s roof:
- Get rid of any fixtures, like vents, antennas and air cooling units. Also, remove the awning.
- Utilize a top-quality sharp knife made of stainless steel remove all the previous sealant around the fixtures you’ve removed.
- Take off the current roof membrane. For rubber roofs on RVs, like TPO or EPDM You will have to remove your roofing material till you are able to discern the plywood structure beneath. Roofs made of aluminum require that you remove the old roof panels to take the roof, and you’ll require a dye mill to take off the fiberglass matting that covers these roofs.
- The plywood underneath and on the roof membrane for signs of damage. If you find places, where wood has bowing or rotting there, is water damage and needs to be replaced. Make sure to clean the rest part of (undamaged) wood with mineral spirits to stop mildew and mold from growing.
- Apply seam tape where the plywood joins along the edges of your camper’s roof at the point where it joins the sides of your camper. This will ensure the seal and strengthen the weak spots.
- Roofs made of rubber are put up by coating several layers of adhesive on the plywood roof before rolling on roof replacement panels. roof new panels. Fiberglass roofs are similarly installed as well, and you’ll paint the catalyst for adhesive resin prior to covering the fiberglass matt and the gel coat. Let the adhesive be sat for a short time until it’s tacky. then apply your roofing material over it and press out any air bubbles while you roll. Cut holes into the matting or rubber for fixtures to go to be put back on the roof.
- Roofs made of rubber are put up using coating the layers of glue on the plywood roof and then rolling roof replacement panels. roof new panels. Roofs made of fiberglass have the same installation as well, and you’ll paint the catalyst of the adhesive resin prior to covering it with fiberglass matt and the gel coat. Let the adhesive be sat for a short time until it’s tacky. then apply your roofing material over it pressing out all air bubbles while you roll. Cut holes into the matting or rubber for any fixtures to go back onto the roof.
- When your roof has been replaced The final step is to put back the RV’s roof fixtures and cover them with caulking to ensure that there are no leaks in your new roof.
How to Fix A Leaky Skylight Roof Vent, AC Unit or Hatch
The roof-mounted systems of RVs like the air conditioning unit or roof vents are in essence holes that are cut into the roof and the edges surrounding them could develop leaks that will require fixing to prevent water damage.
It’s actually an easy task:
- Remove any remaining silicone caulking.
- The surface should be cleaned of roof around the leak using an inexpensive rub pad, or even sandpaper then use the solvent-soaked cloth.
- The edges around the vent or the system with sealant as well as sealant strips and cover all screws.
- Place the vent flange in a position that it’s overlapping with the roof surface by approximately 2 inches in each direction Be sure to put on the sealant to ensure that it is bonded to the roof for a long time.
How to Seal and Cover Your RV’s Roof
An important aspect of maintaining, fixing and replacing the RV’s roof is sealant and coating the roof’s surface to ensure it is more weatherproof and durable.
What is the best RV Roof sealant?
The most suitable sealant to choose to is dependent what is the roof surface and application. In the case of EPDM, TPO and aluminum roofs, the most recommended material is the M-1 sealant ($7.25 for a 10.1-ounce tube).
When sealing the roof window or vent, industry professionals recommend SB-140 butyl-caulking ($5.75 for a 10.3-ounce tub).
To seal RV windows, experts suggest M-1 sealant However, Duralink ($6.25 for a 10.1-ounce tube) can also be used. It offers excellent adhesion to glass.
If you’re sealing rough surfaces, the ideal sealant to make use of would be WebSeal tape.
It features a unique knitted fabric backing and microsealants that ensure it will bond flawlessly on flat surfaces, as well as around angles, curves bolts, pipes, and curves.
It’s also weatherproof and is able to be used in environments with temperatures as cold as 70 degrees Fahrenheit.
How Do You Cover The Roof Of A Rubber RV Roof
In the event that your vehicle’s roof is made from EPDM or TPO it is necessary to coat it again every year or so to ensure that you maintain it in good condition and extend its life expectancy. These are steps to apply Rubber Roof coating to your Camper:
- Examine the roof for leaks and fix them prior to coating the roof of your camper.
- Completely clean the roof Power-wash the roof then clean areas that are dirty or stained using a 1:3 mixture of bleach and water along with a long road broom, or scrubber. If the bleach fails to take the stain out, you can use TSP and water. The roof can be power washed roof following the cleaning process to clean it.
- Clean off older RV roof coatings and any silicone residue surrounding areas like roof openings and vents air conditioner, as well as other parts.
- Fix any raised areas within the roof using the M-1 sealant and EternaBond DoubleStick.
- In order to apply EPDM roofs, it is recommended to apply an even layer of EPDM primer (and let it cure for within 30 minutes) prior to applying your roof coating.
- Then, open the coating container and scrape off any “skin” that may be over the top. Mix the coating for 4 to 5 minutes, or until it’s fully dissolved.
- Use to the roof coating (RoofMate High-Tempere for foot traffic that is light or AES-125 epoxy for lasting outcomes). Allow it to cure for up to 3 days, based on the temperature of your region. After that, apply another coat, but in an opposite direction.
Different kinds of RV Rubber Roof Sealants
As we’ve mentioned to date there are varieties of RV roof coating materials, and your selection will be based on the type you want to use on the RV roof you have as well as the strength you require it to possess.
- RoofMate High Tensile: Non-flammable, easy to apply, and fast to dry, RoofMate HT is a highly-performing elastomeric acrylic roof coating that lasts approximately six years prior to the need to coat it again. It’s designed to handle pedestrian traffic with two characteristics: very high tensile and high extension. Apply a primer prior to coating using RoofMate HP, which is priced at around $166.95 for a 5 gallon bucket.
- Ultra Shield: If you don’t have to add a roof on the roof of your RV, Ultra Shield is an option worth considering. It’s an alternative elastomeric acrylic roof coating that is affordable It’s easy to roll on application it cures quickly and isn’t flammable. Ultra Shield will last for approximately five years before re-coating. Make sure to use a primer prior to coating the surface with Ultra Shield, which costs around $76.95 for a bucket of 5 gallons.
- AES-125 The two-part elastomeric epoxy coating has the advantage of being extremely long-lasting and extremely waterproof. However, despite its strength however, it’s not made to be used for walking. The application also requires practicing. AES-125 is priced at $485 for 5 gallon bucket.
- EPDM Rubber Coating Rubber EPDM in the liquid coating is available in two solvent bases. It is the most expensive RV roof coating and is one of the toughest to deal with. It’s in no way oil-resistant, but it can be extremely flammable prior to being cured and is not recommended for foot-traffic areas. EPDM rubber coating has a lower elongation and is priced in the range of $1.50 to $2.50 for each square foot material. For a 255-square-foot roof the coating material costs about $382.50 or $637.50.
How to Make Your RV Roof
Even if you’re replacing the roof of your RV roof by yourself the materials alone will cost a hundred dollars.https://5398e3bce44e4413c51d665ac02e4b85.safeframe.googlesyndication.com/safeframe/1-0-38/html/container.html
You can extend the life that your roof and decrease the frequency of coating it regular cleaning and checking it for leaks regularly fixing damage fast and ensuring it is covered.
These are RV roof maintenance tips and the most effective practices to help with RV roof damage prevention.
1. Make sure you clean your RV Roof Frequently
To be part of the RV maintenance plan You should wash the roof on your RV.
Dirt and debris could damage the sealant on the RV roof in time and cause it to be more susceptible to leaking and water damage.
So, frequent cleaning is essential to maintain the integrity of seals and the waterproofing on the camping roof.
A best practice is to clean the roof whenever you’re deep-cleaning following every camping trip.
To clean your RV roof correctly, select your detergent according to the kind of roof that you have.
If the RV’s roof is made of fiberglass or aluminum then you can wash it with a similar mild soap that you use to clean all the other parts of your RV.
In the event that your RV’s roof is made of EPDM or TPO then you may require an environmentally safe rubber RV roof cleaner. Whatever the case, be sure to rinse it thoroughly after you’ve cleansed it!
2: Check For Leaks
The roof cleaning process is the ideal time to inspect the RV’s roof for any leaks.
When you’re power-washing the roof Ask your spouse or a close friend to go around in the cabin, looking over the walls and ceiling for drips or dampness.
When you clean or rinse the roof and look at cracks within the roof seal. Also, check for any soft spots that could be the sign of rot or water damage. Make repairs as quickly when you find them, to limit damage.
3. Repair RV Roof Damaged ASAP
If you spot the presence of leaks or any other damage on the roof or the fixtures on it and fixtures, fix them.
It’s better to invest just a few hundred dollars for repairs in the near future, rather than to shell out nearly $10,000 to replace the entire roof.
Furthermore, any damage that is allowed to go untreated can become worse and result in further issues, or even costly repairs that are more expensive and extensive.
It’s the same for roof-top systems, such as your air conditioner. If it ceases to function the system will be flooded with moisture within the system and stress sealing between it and your roof or cause mold and mildew to grow.
4: Investing In A RV Roof Cover For Durability
In addition to the necessary maintenance to extend the life on your camper’s roof You may also want to think about purchasing a roof covering for your camping vehicle or on the roof.
It’s best to keep your RV inside, however it can be very costly and may be beyond the budget of the majority of RV owners.
Another option is a waterproof as well as UV resistant RV covering and RV roof covers.
They are available in a broad variety of sizes and sizes, so the key is to choose one specifically made to fit the dimensions of your camper or roof.
But it is true that even RV covers aren’t without their flaws. A high-quality RV cover allows water to evaporate, but it also stops airflow from moving around your RV under it, so mildew is likely to develop.
Therefore, it’s recommended to take your RV some time and only be sure to cover it during storage season.
Notice: Tarps are even more harmful than RV covers in permitting mold and mildew to spread over the short time therefore, only utilize them as a temporary solution.
Conclusion
While an expert RV roof replacement will probably cost you as much as three hundred dollars for each linear foot you cover, you could drastically reduce the expense by replacing the roof of your RV roof your own.
I hope that this article provided you with all the information that you need to know about what the RV roof replacement could cost as well as the materials needed, and the steps you can repair and replace the camper’s roof by yourself.